
Turning a picture into a silhouette is one of the many artistic ways to express your style and creativity. It is also a great way to make an image stand out in posters, flyers, and other cover designs.
You might think it is not beginner-friendly, but trust us! There is now a super helpful photo editor software that can easily transform photos into beautiful silhouette images.
All you need is the new Colorcinch, your number one photo editor and cartoonizer! This editor is entirely web-based, which means you don’t have to download or install anything. The best part is that it has a very simple design so it won’t take much time to learn how to use all its available photo editing tools.
How to Make Silhouette Pictures Using Colorcinch Photo Editor
The tutorial below will show you two different ways of turning any image into a cool silhouette effect with the Colorcinch free software. We will show you direct step-by-step guides to help you get the job done in just a matter of minutes.
Make a Silhouette Image in Just a Few Clicks
Step 1: Open the Colorcinch website on your browser and choose an image
The first step is to go to the Colorcinch site and open the photo you want to edit. You can either upload your own file or choose from the readily available stock photos, as can be seen below:

If you want to upload your own photo, just click on “UPLOAD” and select a file from your device.
For this tutorial, we will be using the portrait image in the middle. Just click on the photo and you will be automatically redirected to the Standard Photo Editing interface.
This is what you will see:

Step 2: Click on Effects and select Sketcher
Colorcinch has created beautiful effects for users to choose from. Click on the “Effects” icon, it’s the third one from the top and it looks like a white magic wand.
This will show you the different categories under Effects: Cartoonizer, Sketcher, Painting, and Digital Art.
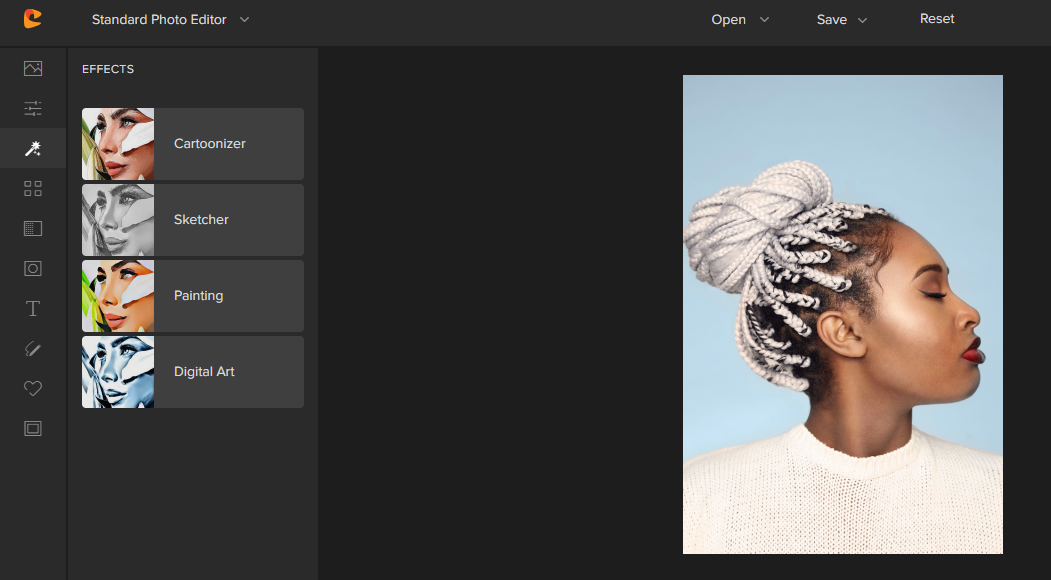
Since we wanted to achieve a silhouette effect, we need to choose Sketcher.
Step 3: Choose the Sketcher Effect you want to use
There are 28 Sketcher styles available, labeled SK001 to SK028. These are not shown chronologically so if you want to know their codes, hover the mouse over each sketcher style and you will see their labels on the top-left portion.
Just by looking at the menu, you can already get an idea of how your photo will be transformed after the edit.
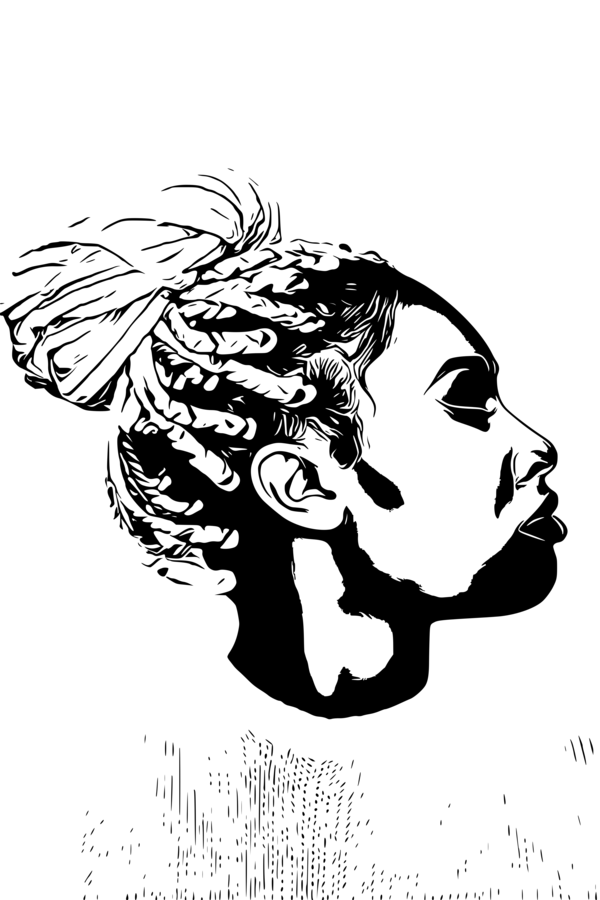
The first three Sketcher Effects (SK003, SK005, and SK020) are great choices to create a silhouette image. In this tutorial, we chose the third one which is the “SK020”.
This is what our photo now looks like:
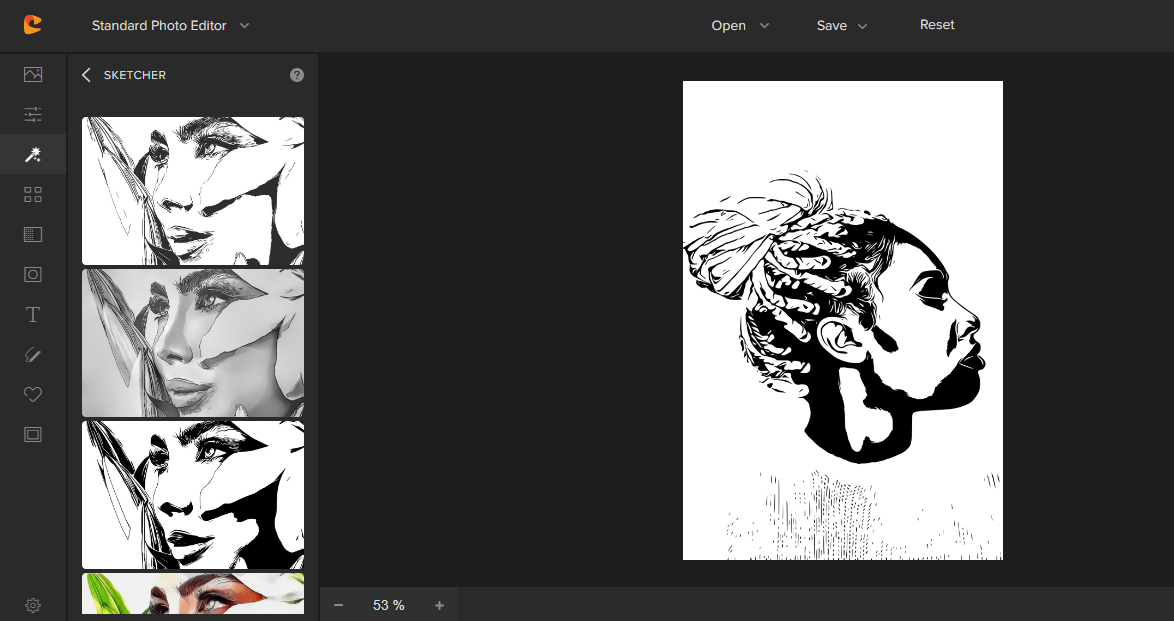
To see the other styles, just scroll down on the menu. Easily test them on your own photo by clicking on each effect. It will only take a few seconds for Colocinch to apply the changes.
Step 4: Adjust and customize
Colorcinch allows us to fine-tune the details of the photo further. Hover your mouse on your chosen effect and click on the “Settings” icon right beside the heart icon at the top-right corner.
You can adjust the detail anywhere from 0 to 100, depending on your preference.
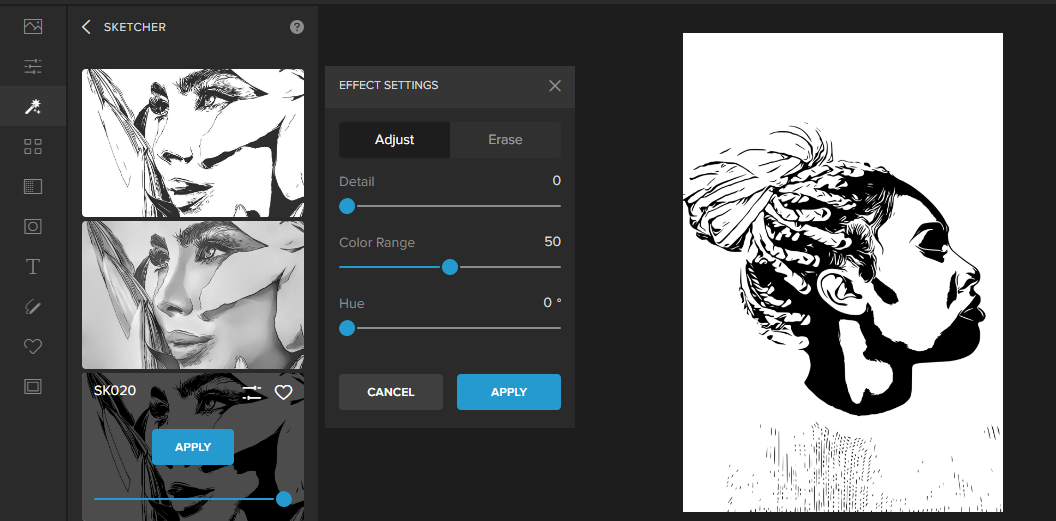
Alternatively, you can also take advantage of the “Erase” tool to create a unique and beautiful silhouette image as can be seen below.
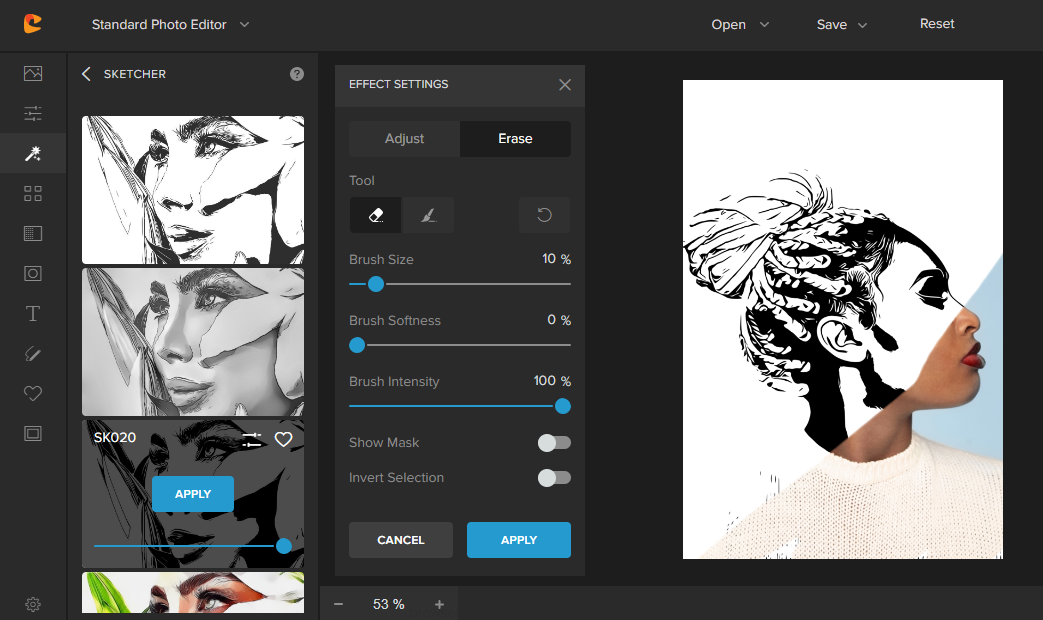
Click on “Erase” and choose your settings. Then, brush over the portion of the photo you want to erase the sketcher effect. This will return the original colors of the image we uploaded. Use your creativity and create a cool edit with this function!
Step 5: Save your new silhouette image
After you’ve finished your edits, now is the perfect time to save your work! Colorcinch gives us the option to either save the image as a project or straight to the device. And that is how easy you can turn pictures into silhouettes in just a few clicks, no photoshop required!
Make a Silhouette Image With More Advanced Techniques
With Colorcinch, there are definitely more fun and exciting ways to create silhouettes! Are you ready to learn new photo editing tricks? We are going to show you how to change backgrounds and create layers to make captivating silhouettes.
Step 1: Remove the existing background
We will be using the same photo above to create a different type of silhouette. This time, we are going to completely remove the existing background in the frame.
We know, we know. This process already seems hard and tricky on the get-go. But Colorcinch make it so much easier for us with its AI-powered background remover!
All you have to do is click on the “Remove Background” tool that you can find at the bottom of the menu under the Creative Section. And, voila! The hard part of the job is instantly done.
This is what you will see on your screen:
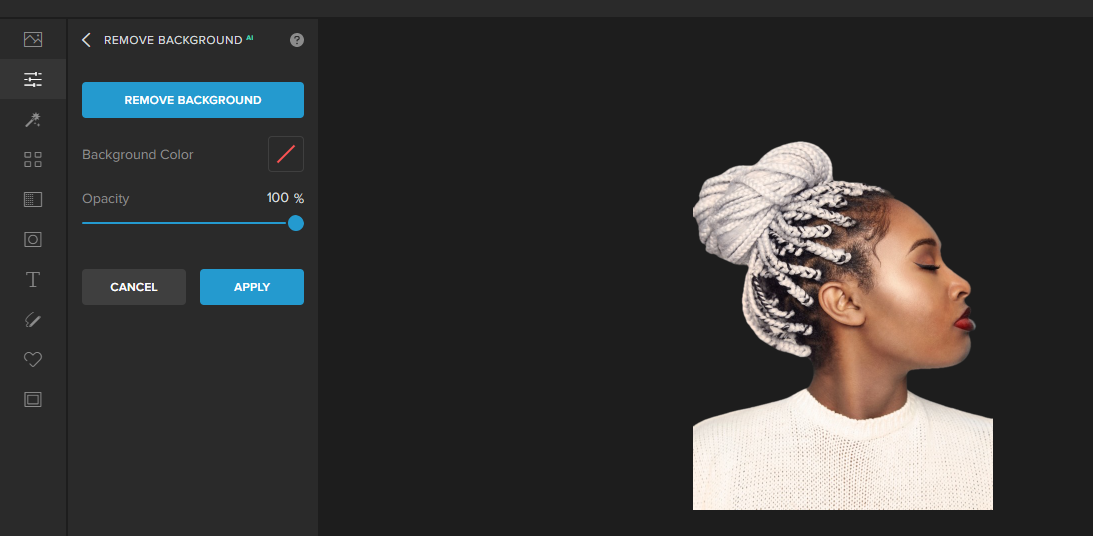
As you can see, Colorcinch removed the original background and we are left with the main subject of the photo. Do not forget to save this picture on your computer as a PNG file.
Step 2: Reset the project and choose a new background
The next step is to click the reset button so we can start on a new project. The website will automatically refresh and you will see this again on your screen:

Now is the time to showcase your own creativity. You need to think of a great background for your project. Again, you can upload your own photo or choose from the stock photos available on the colorcinch website.
Just click “Upload” and choose any file from your computer device.

For this tutorial, we used a landscape version of this photo as our new background
Step 3: Create a new layer by uploading the saved photo from step 1
Now that we have a new beautiful background, we will be adding the photo that we actually want to turn into a silhouette.
Look at the first icon at the top-left of the menu. This is the “Image Manager” tool that will let you upload new images to your current project.
Click “Upload Image” and browse through your computer’s files until you find the image that we saved earlier. You can add more than one file from your computer and they will all appear under the “Your Images” section.
Now, all you have to do is click on the uploaded photo and it will be added as a new layer to your current project.
This is now what your screen looks like:
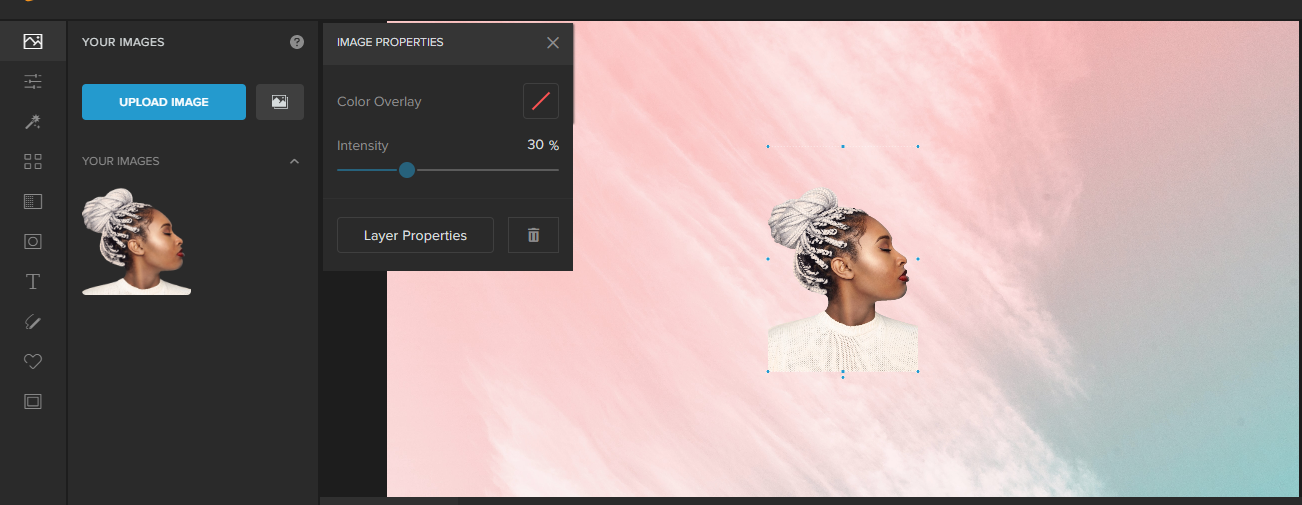
Step 4: Turn the photo into a silhouette
To convert the main subject into a silhouette, choose your preferred silhouette shade in the color overlay option. In this tutorial, we are using shade #008AFF.
Then, make sure to increase the intensity to 100 as can be seen below.
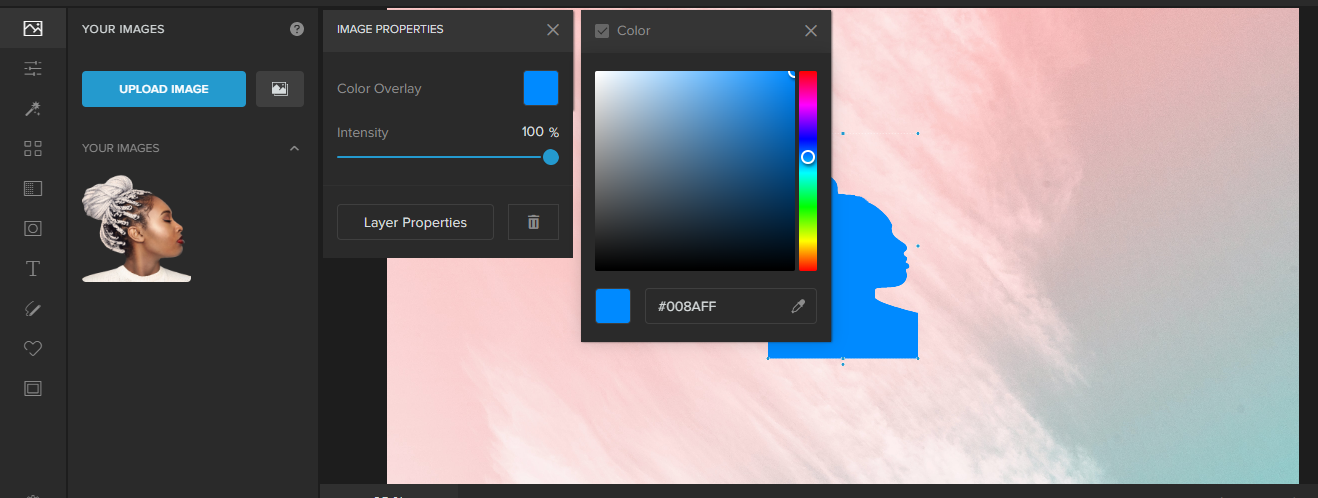
If you are not satisfied with how the color of the new silhouette blends with your chosen background, you can choose a different color or shade available from the spectrum.
Step 5: Adjust and customize
You can adjust the size of the silhouette image to make it bigger or smaller, depending on your preference. Just click on the image and drag the edges of its handles diagonally.
Since the silhouette is a new layer separate from the background, you can also reposition the image to anywhere you want it to be.
For example, we originally have this silhouette in the center.

Then, we made it bigger and repositioned it to the left side.

Just experiment and play around until you achieve your preferred overall look.
Step 6: Save your new silhouette image
Once you are satisfied with the results, you can save the finished product on your device or on your drive. Alternatively, you can also save the project in your Colorcinch account if you want to go back to it later and make further edits.

Use Colorcinch for All Your Future Edits!
While the second tutorial involves more steps, don’t you agree that Colorcinch makes it a lot easier for us to use advanced photo editing skills? Now, even beginners can make a silhouette like a pro!
Practice once or twice using the step-by-step guides above until you are ready to create your own stunning silhouette image and add your own twist. Go with a classic black and white contrast, or you can experiment with colors and go bold! Nothing is stopping you from being unique and creative.


