Ever wondered how to turn a photo into a cartoon?
Maybe you’re a fan of graphic novels and comic strips. Or perhaps you’d like to cartoonize yourself, someone, or something!
If so, we have the lowdown on exactly how to do it. There are two main ways to cartoon yourself:
- The long way (using Photoshop)
- The quick and easy way (using our free cartoon maker)
We’re going to look at how to use both methods so you can decide which is best or easiest for you.
Although we’ll be looking at using Photoshop CC first to cartoonify an image, don’t worry – we’ll give you simple step-by-step instructions and images so you can follow along.
If you don’t have Photoshop (or don’t want to use it), then you can skip the first part and go straight to learning to use our free cartoon maker instead.
Let’s get started!
1. Using Photoshop CC to Cartoonize Yourself
“Why would I use Photoshop to cartoonize me when I can use a free cartoon maker?” I can hear you ask.
Good question!
Well, we would like to help you to learn new skills and different ways of doing things so that you can decide which method suits you (and your project) best.
If you don’t have the latest CC version of Photoshop, then this tutorial should still work for whatever version you’re running.
As is common with Photoshop, there are several ways of doing the same thing (which can be confusing – sometimes too much choice is not necessarily a good thing), depending on what kind of cartoon effect you’re going for.
What kind of photo should you choose for the best results?
One of yourself (or someone else) with a clean background is ideal.
If you don’t have a plain background on your image, don’t worry too much. You can cartoonize landscapes as well as people.
If you want to practice on a different photo, then you can download free stock images of people from places like Pexels, Unsplash or dozens of other sites to experiment with (that’s what I’m using for this tutorial).
Step 1: Open Photoshop
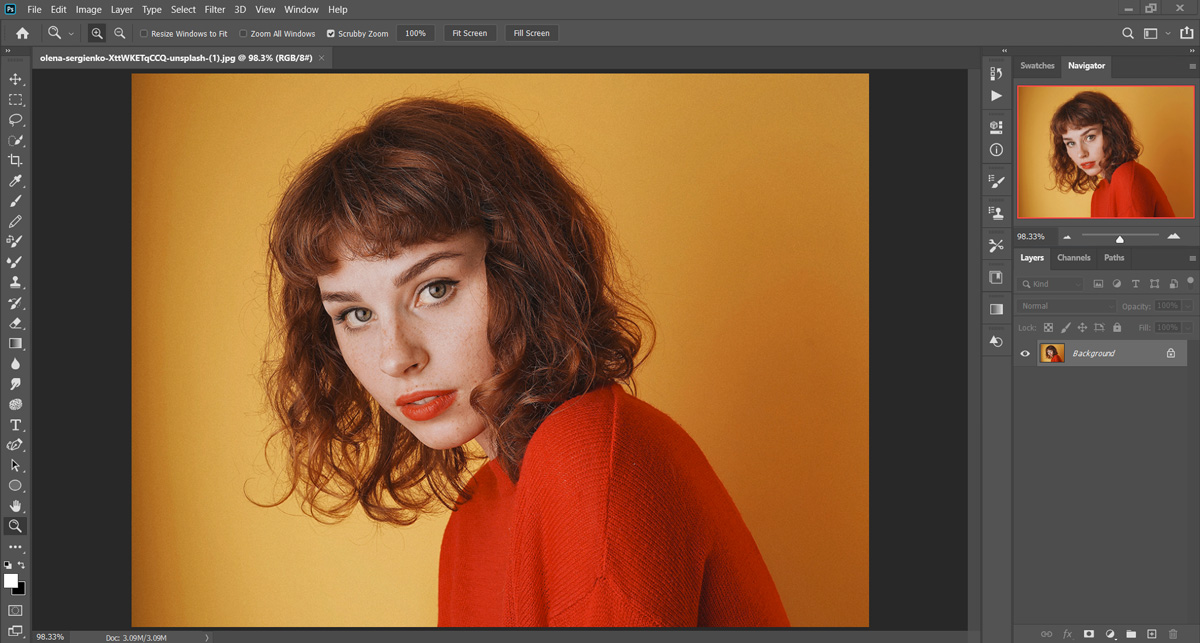
Once you have your chosen victim (sorry, subject!), open it in Photoshop CC or whatever version of Photoshop you’re using.
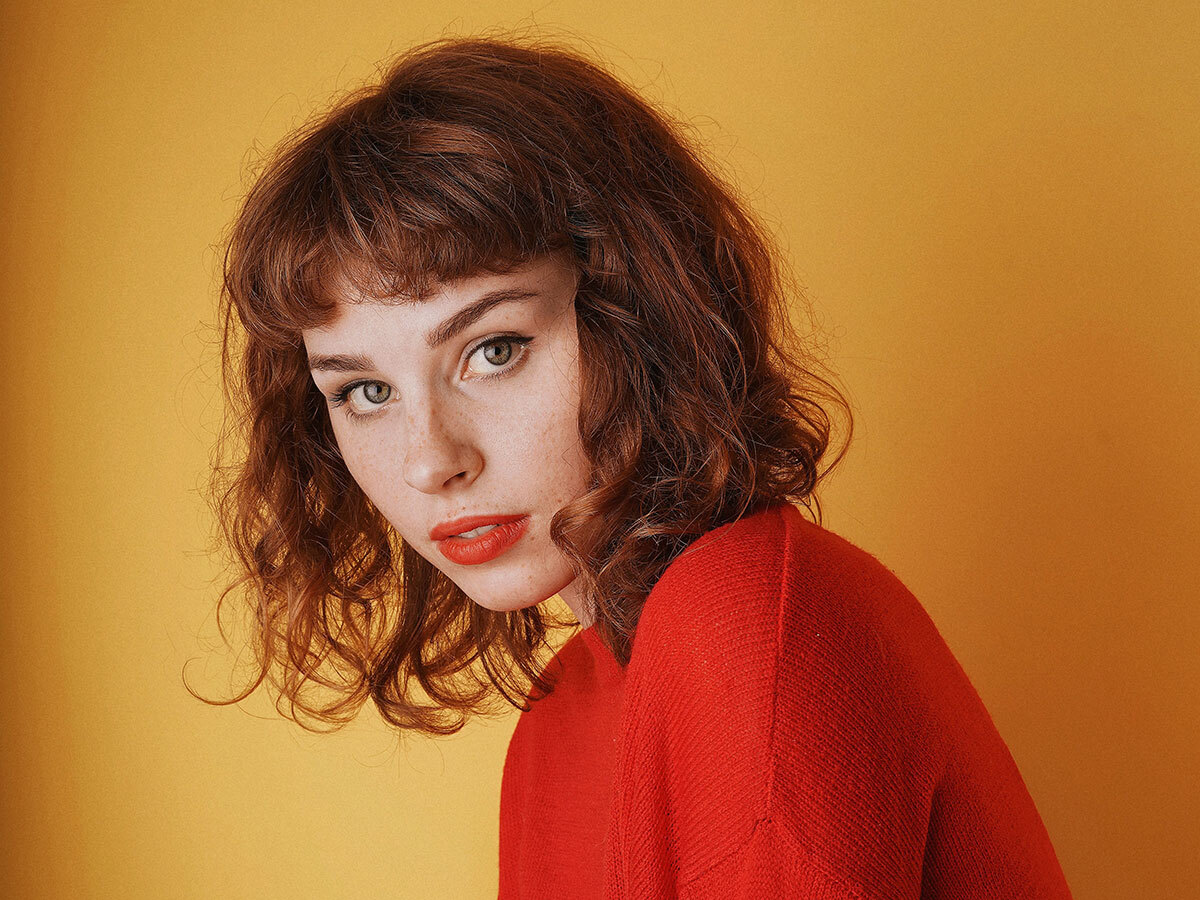
I chose this portrait by Olena Sergienko on Unsplash:
Step 2: Duplicate the Layers
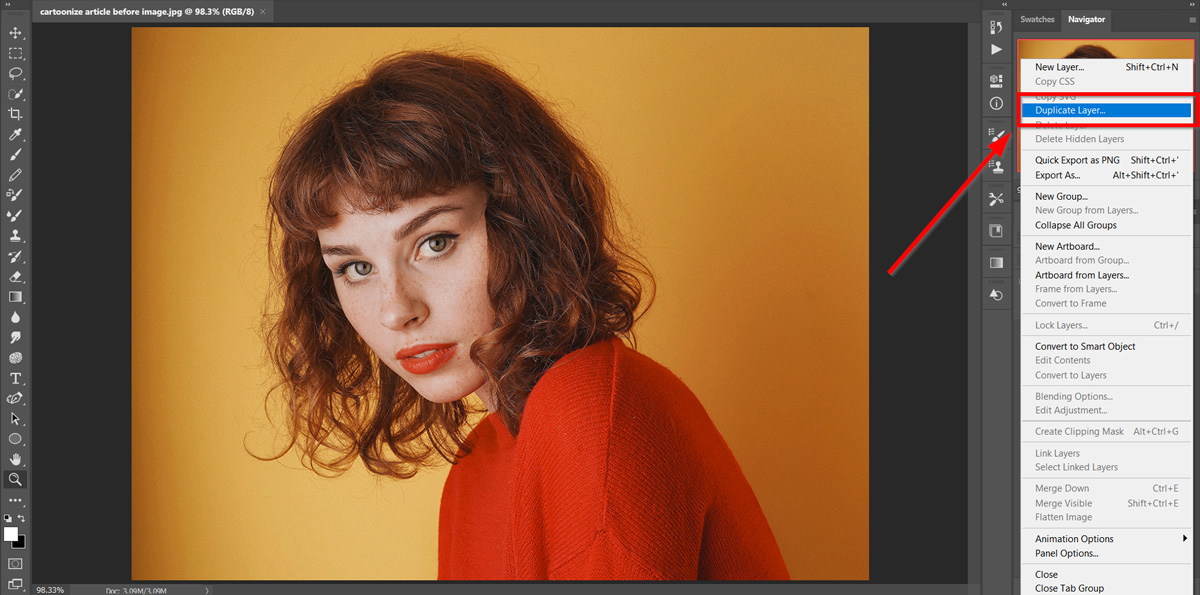
Duplicate the layer by going to the Layers panel on the right-hand side of the screen and clicking the drop-down menu icon at the right-hand side of the Layers Panel (it looks like a square made of horizontal lines).
Click on Duplicate Layer from the menu that will appear:
Click OK in the window that will appear next:
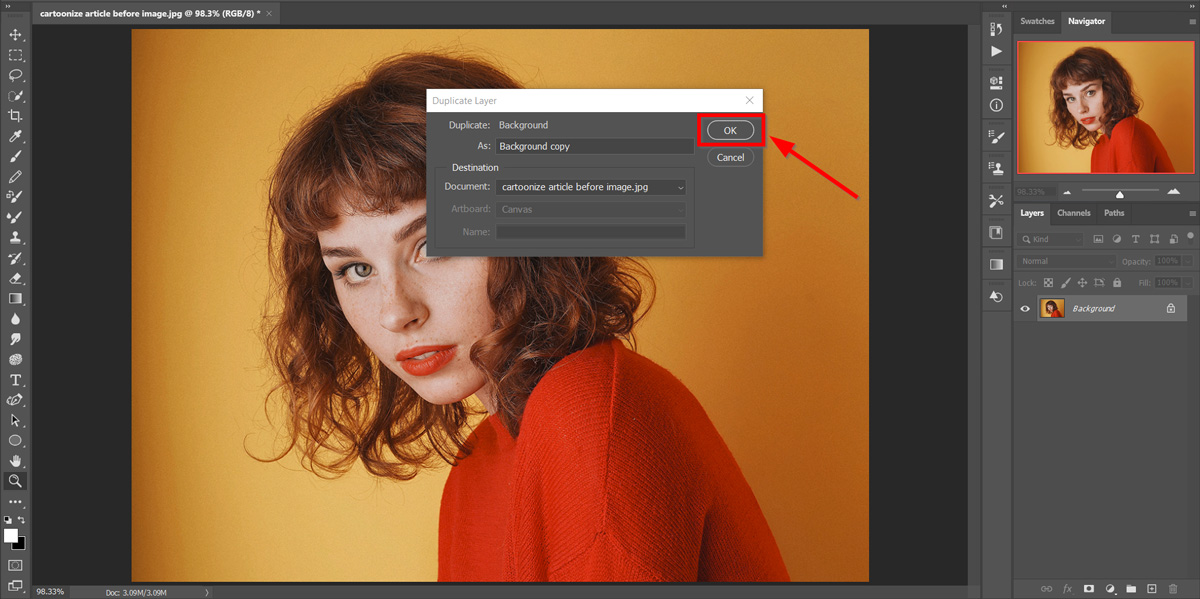
Or, you can take the shortcut by pressing Cmd/Ctrl + J depending on whether you’re using Mac or Windows.
You’ll see the duplicate layer as Background Copy in the Layers Panel:
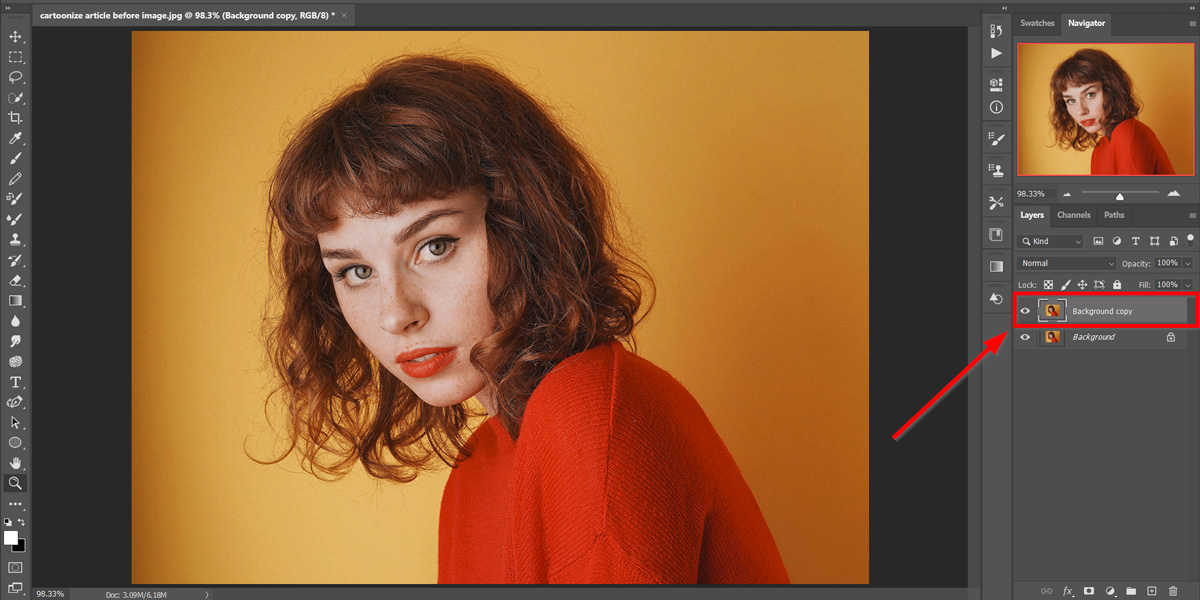
Make sure that the Background Copy is active – it should be a lighter shade of gray than the Background layer. If it’s not, click once on it to activate it.
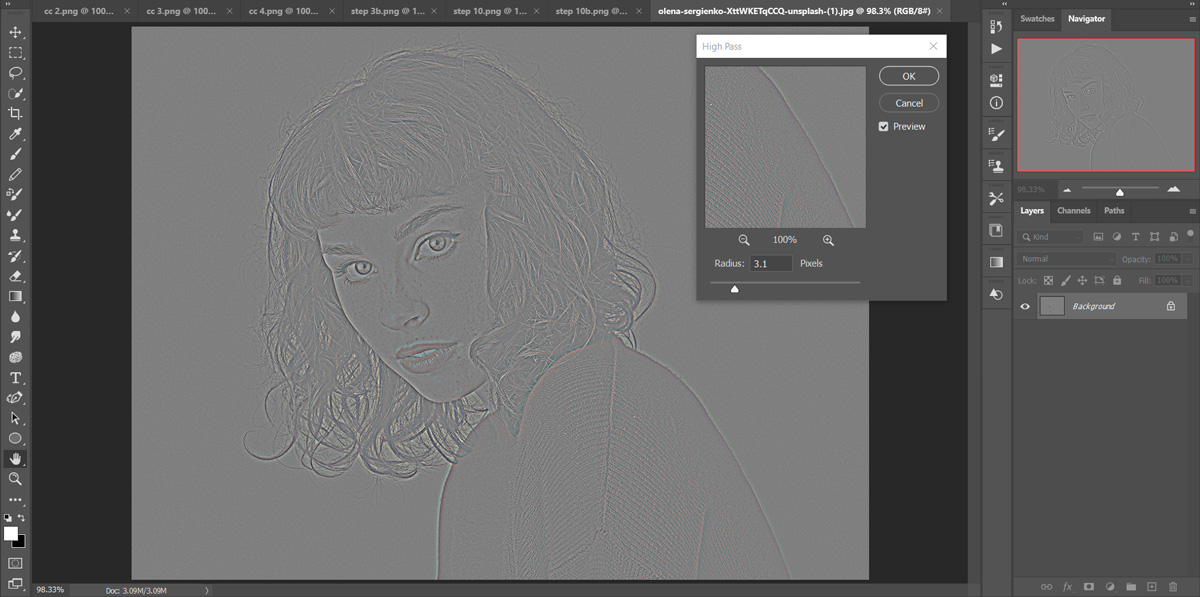
Step 3: Add a High Pass Filter
Go to the Filter menu in the top menu bar and click Other in the drop-down.
Choose High Pass:
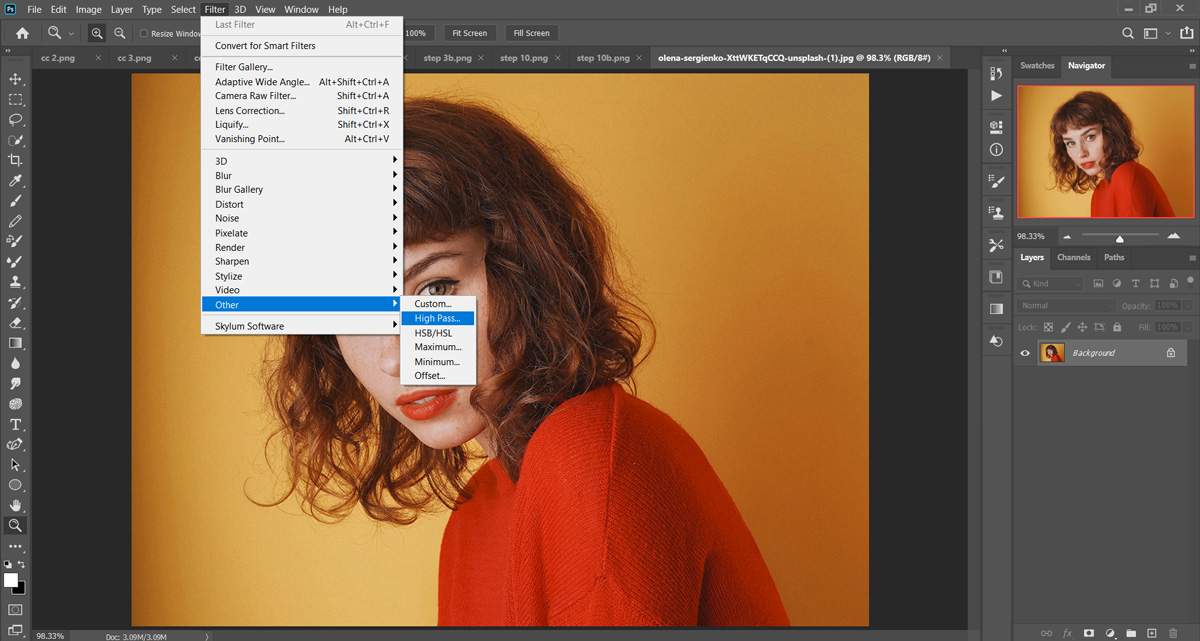
The image will look gray and weird at this point- but it’s meant to, so don’t freak out!
Adjust the slider in High Pass until you see an outline of your person.
Anything from a 3.0-8 radius is a good starting point, but you may need to play with the slider to get a clear outline.
Click OK when you are done:
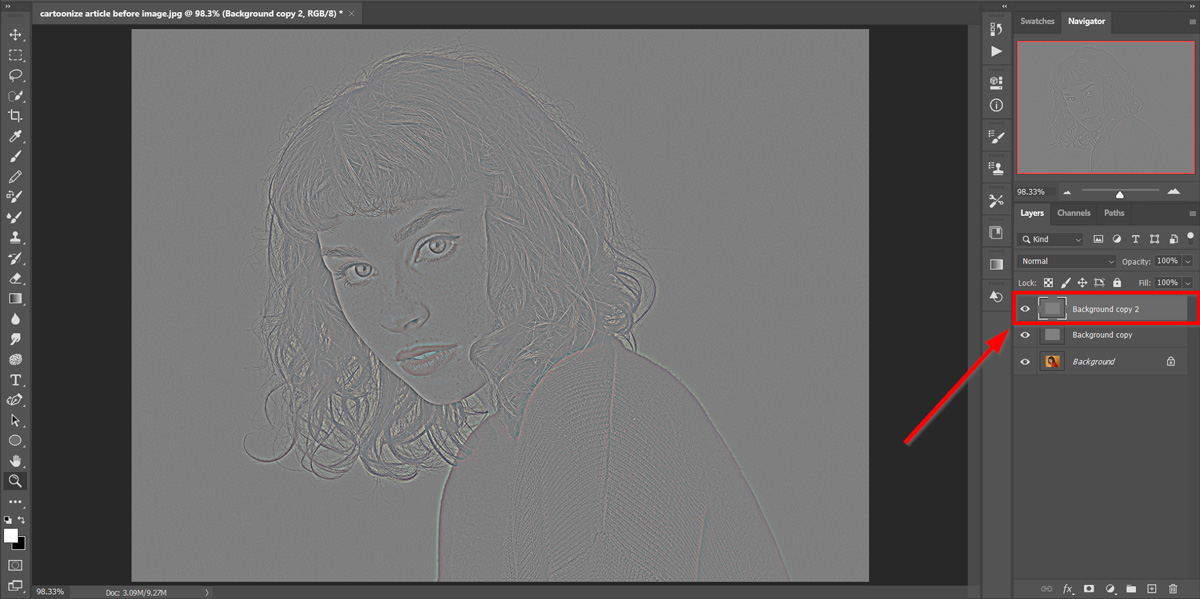
Step 4: Duplicate the Background Copy Layer
Duplicate the layer by going to Duplicate Layer in the Layers drop-down again, or take the shortcut Ctrl/Cmd+J instead:
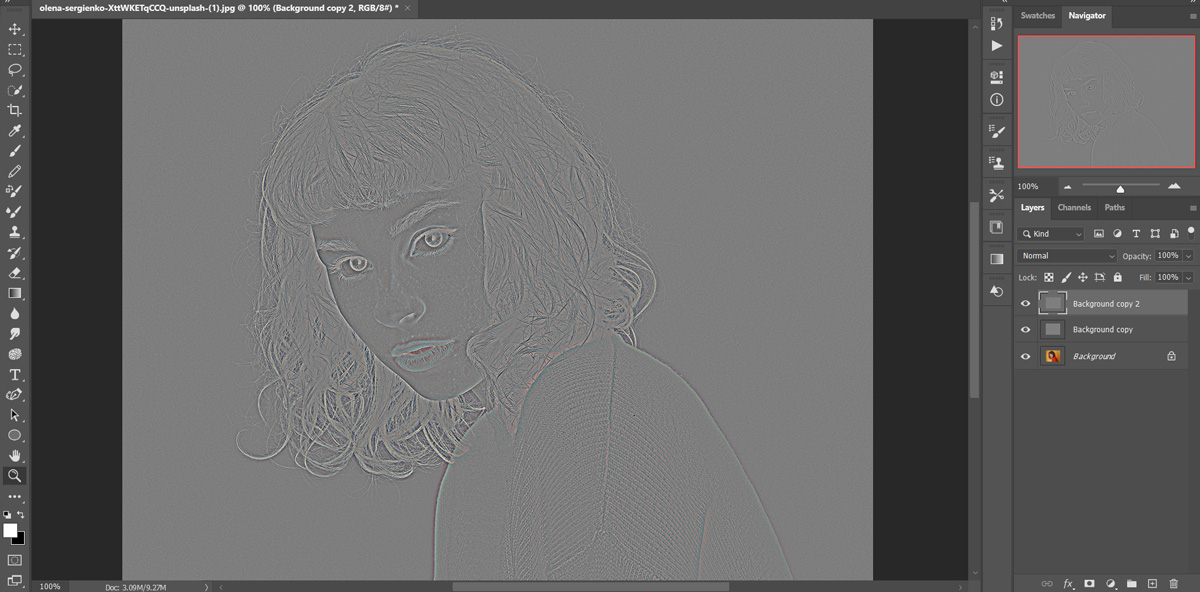
Step 5: Invert the Top Layer
Invert the top layer by pressing Ctrl/Cmd+I.
You won’t see much difference in the image at this point, but it’s an important part of the process:
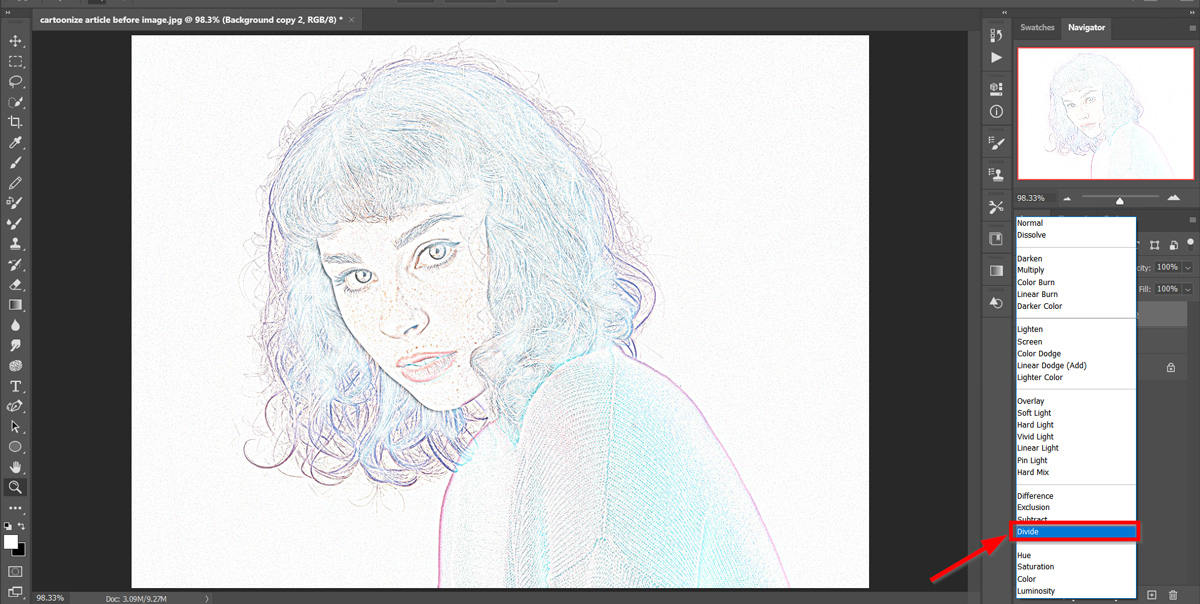
Step 6: Change the Blending Mode
Next, you need to change the Blending Mode to Divide.
Go to the Layers Panel on the right-hand side of the screen where your background layers are.
There is a drop-down menu next to Opacity, which will currently show Normal as the default option.
Click this drop-down, and choose Divide from the list that appears:
Step 7: Merge the Layers
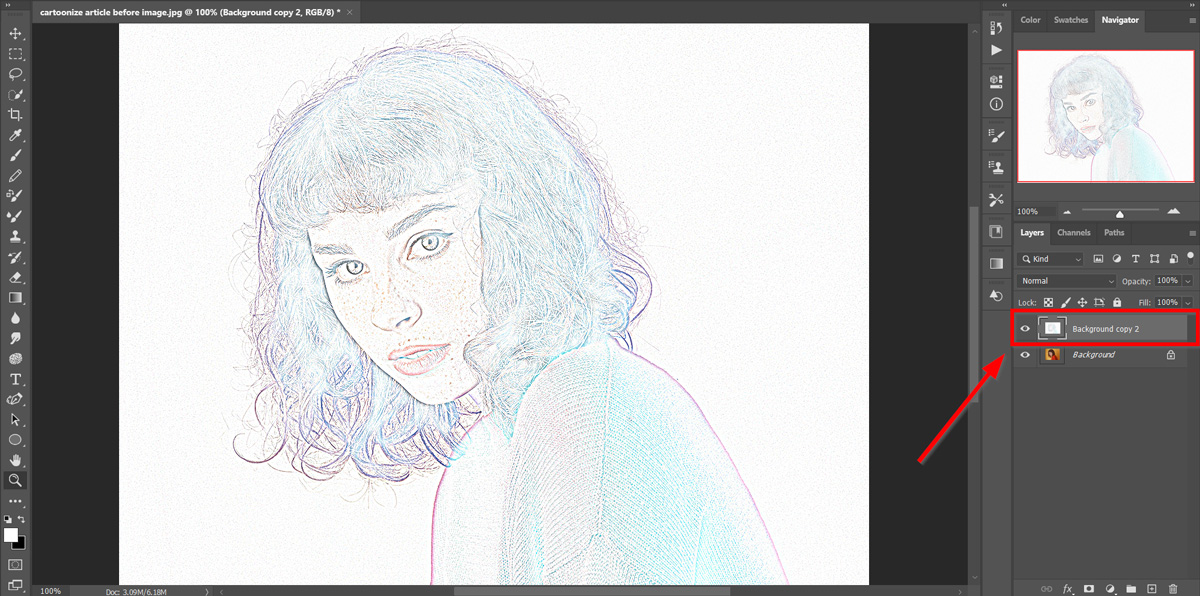
Now, we’re going to merge the top two layers. Don’t worry, it’s easier than it sounds!
Go to your Layers Panel.
The top Background Copy 2 layer will be light gray, to show it’s currently selected.
Hold Shift and then click on the Background Copy layer so that both top 2 layers are selected and light gray:
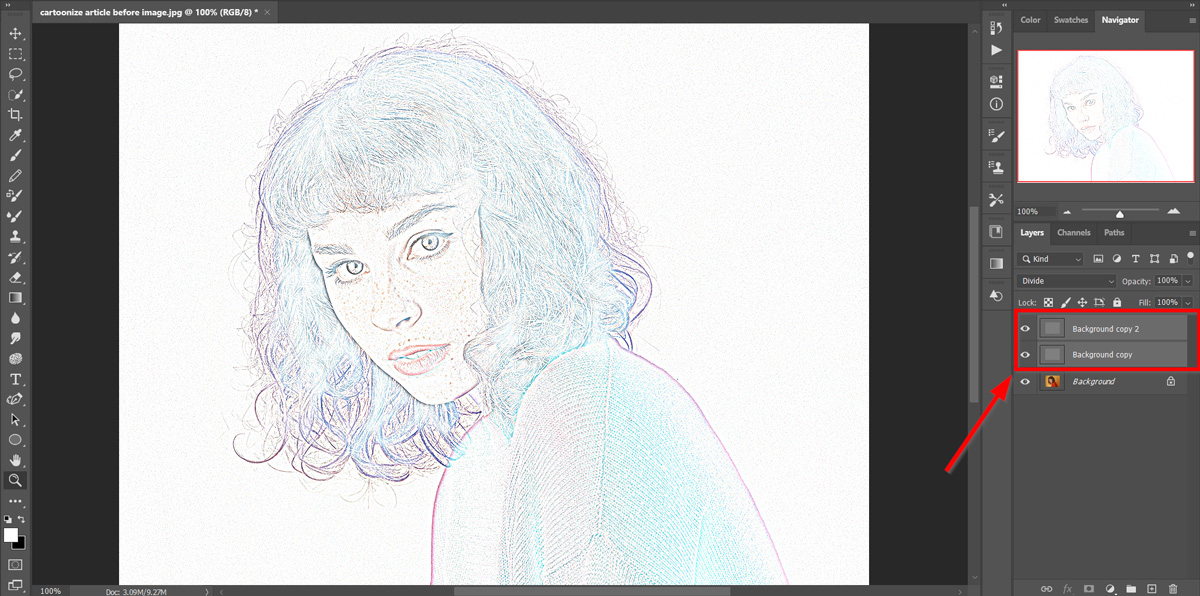
Next, press Ctrl/Cmd+E, which will merge the top 2 layers so that you now only have Background and Background Copy 2 left in the Layers Panel:
Step 8: Adjust the Levels
Open Levels by clicking Ctrl/Cmd+L – or go to Layers and create a Levels Adjustment Layer by clicking on the black and white circle at the bottom of the Layers Panel and choose Levels.
Slide the left-hand black slider towards the right until it reaches just inside the white area of the Histogram, then move the gray slider to the right until your image looks similar to the one I have:
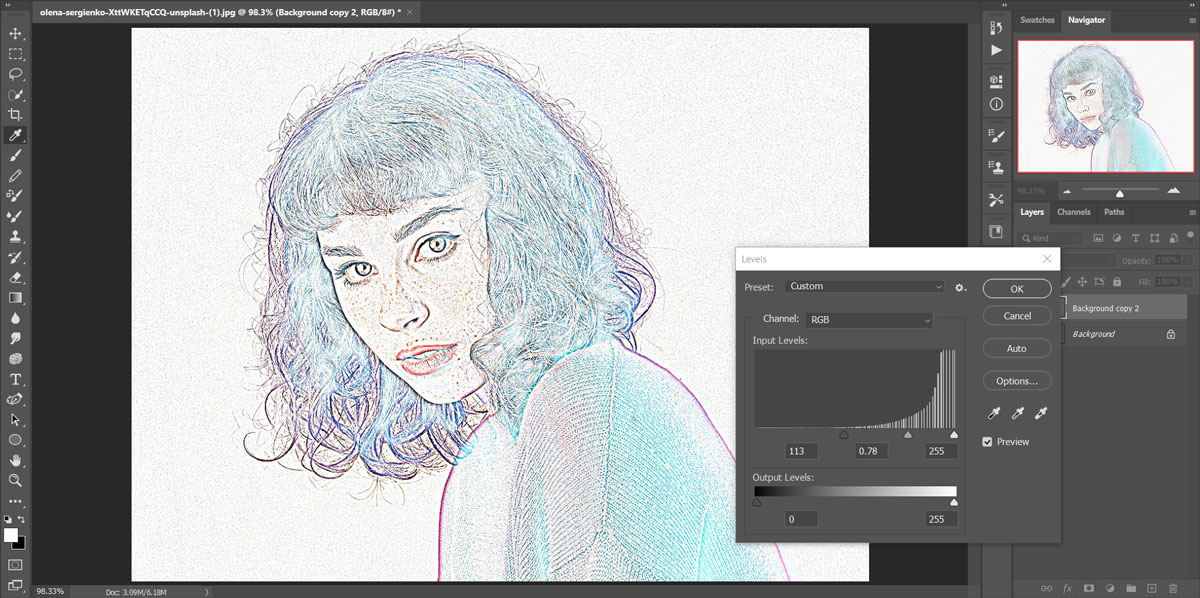
Click OK when you’re done.
Step 9: Duplicate Layers and Change Layer Order
Click on the bottom Background layer in the Layers Panel so that it turns light gray.
Duplicate it by clicking Ctrl/Cmd+J so that you have Background Copy and Background Copy 2:
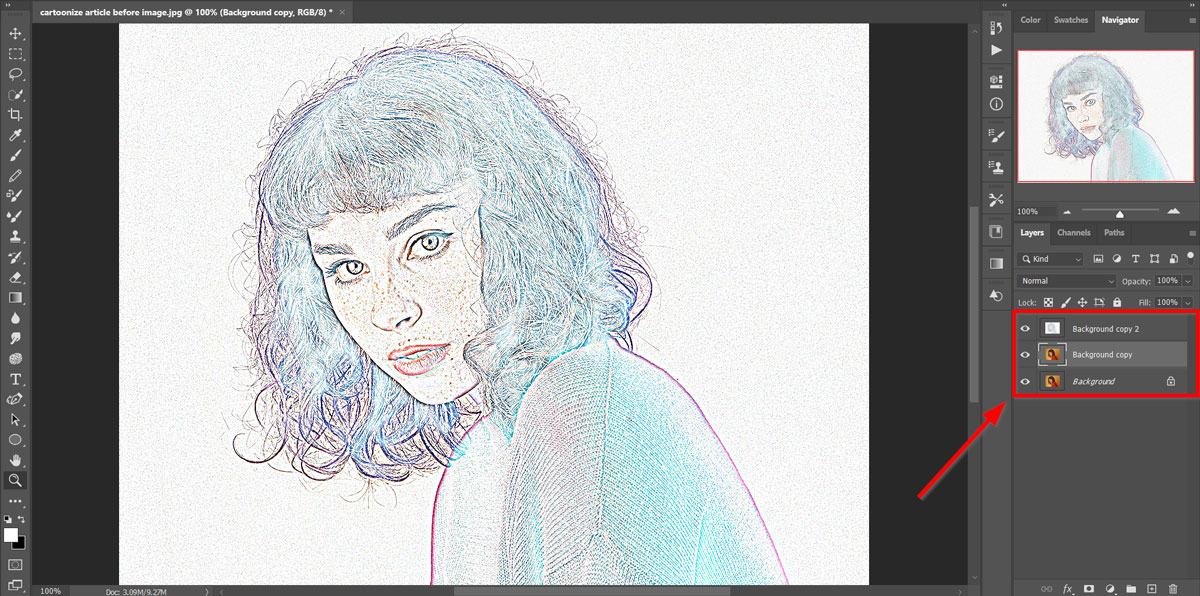
Click and drag the Background Copy layer to the top of the Layers Panel, so it is now on top of the Background Copy 2:
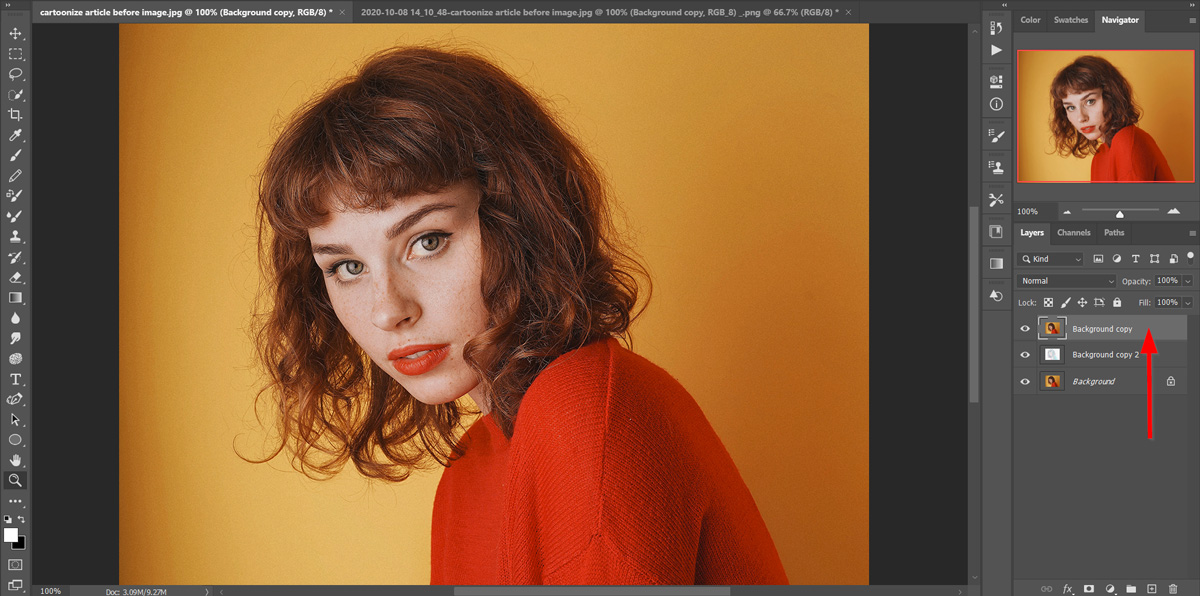
NOTE: You may have to click and drag a couple of times to get it up on top, as it never seems to work the first time for me (although it might for you).
Your photo will now look like it did before you started, but don’t worry – you’ve merely covered up the adjustments we made earlier with the background copy layer.
In the next few steps, we’ll bring it all together and the magic will happen.
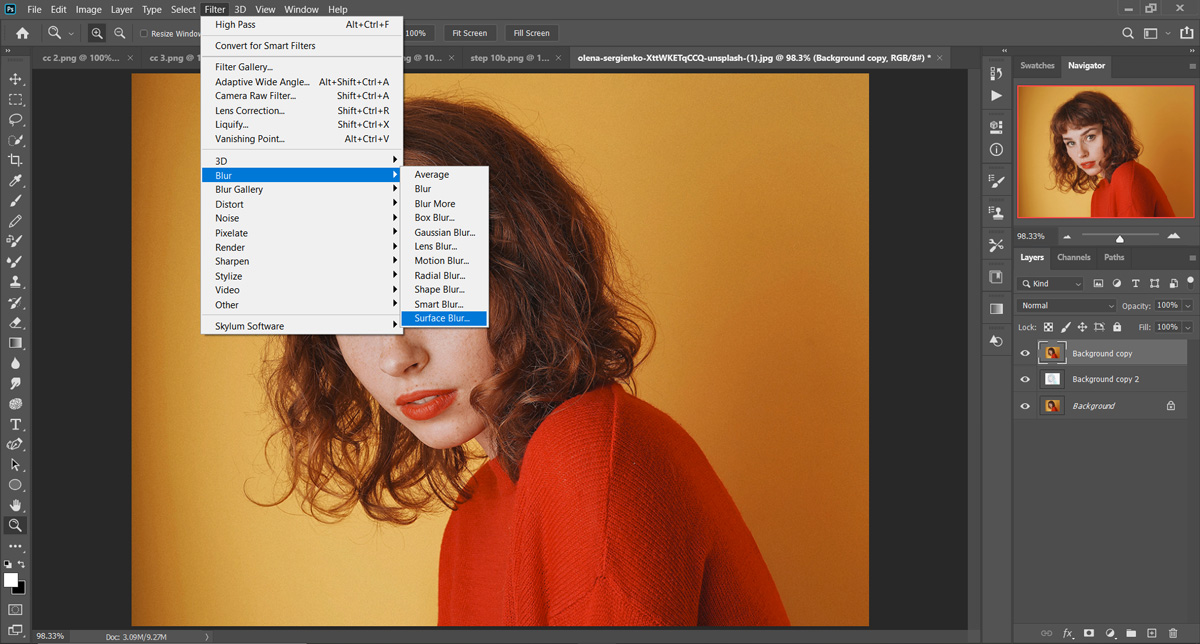
Step 10: Add Surface Blur
This is the fun part, where you start to turn your photo into a cartoon!
Go to the top menu bar and click Filter – Blur – Surface Blur.
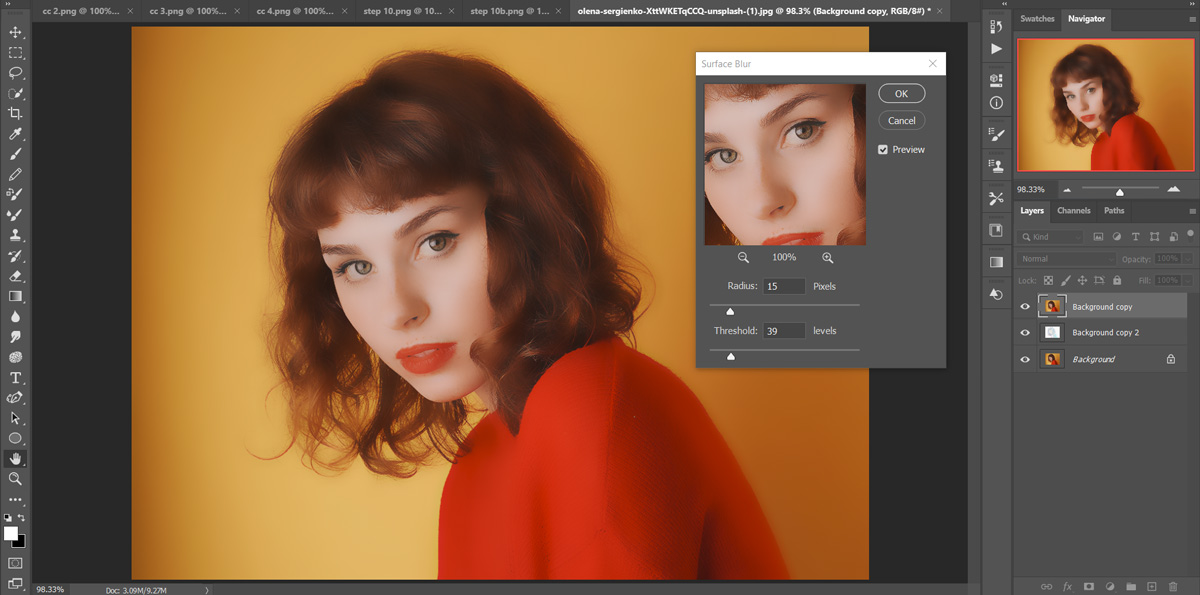
Move the sliders around until you have a smooth look to the surface color and texture.
I used Radius 15 and Threshold 39, but you may have different settings.
Click OK when done:
Step 11: Change the Blending Mode
Final steps, yay!
Go to the Blending Mode drop-down in the Layers Panel again.
Change it from Normal to either Hard Light or Linear Light mode (depending on which look you prefer) and you’ll see your cartoonized image:
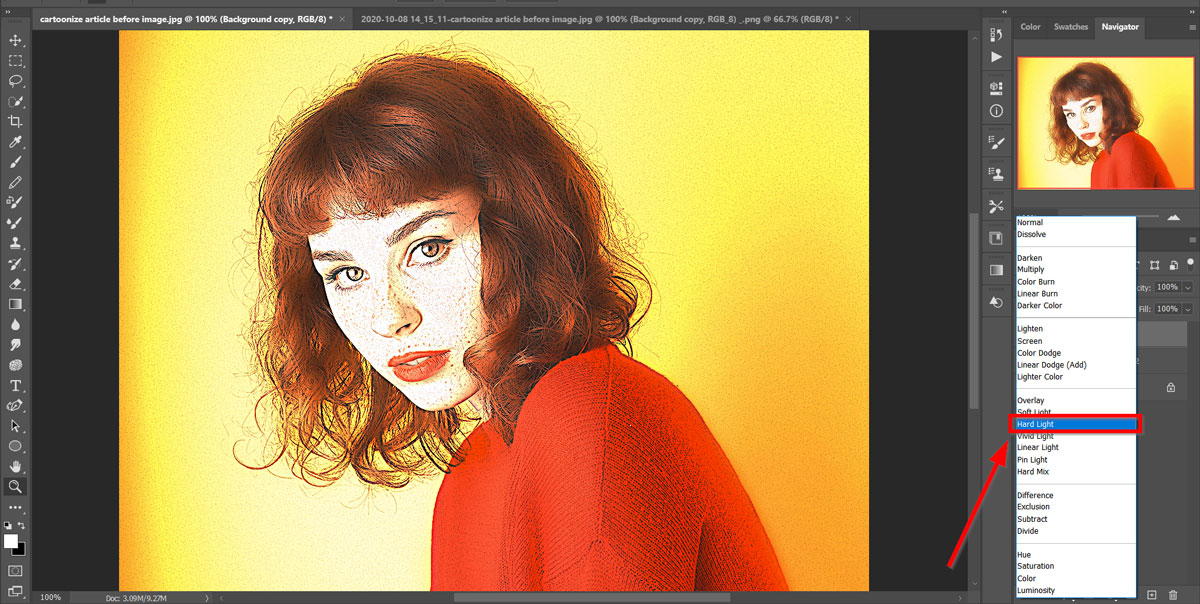
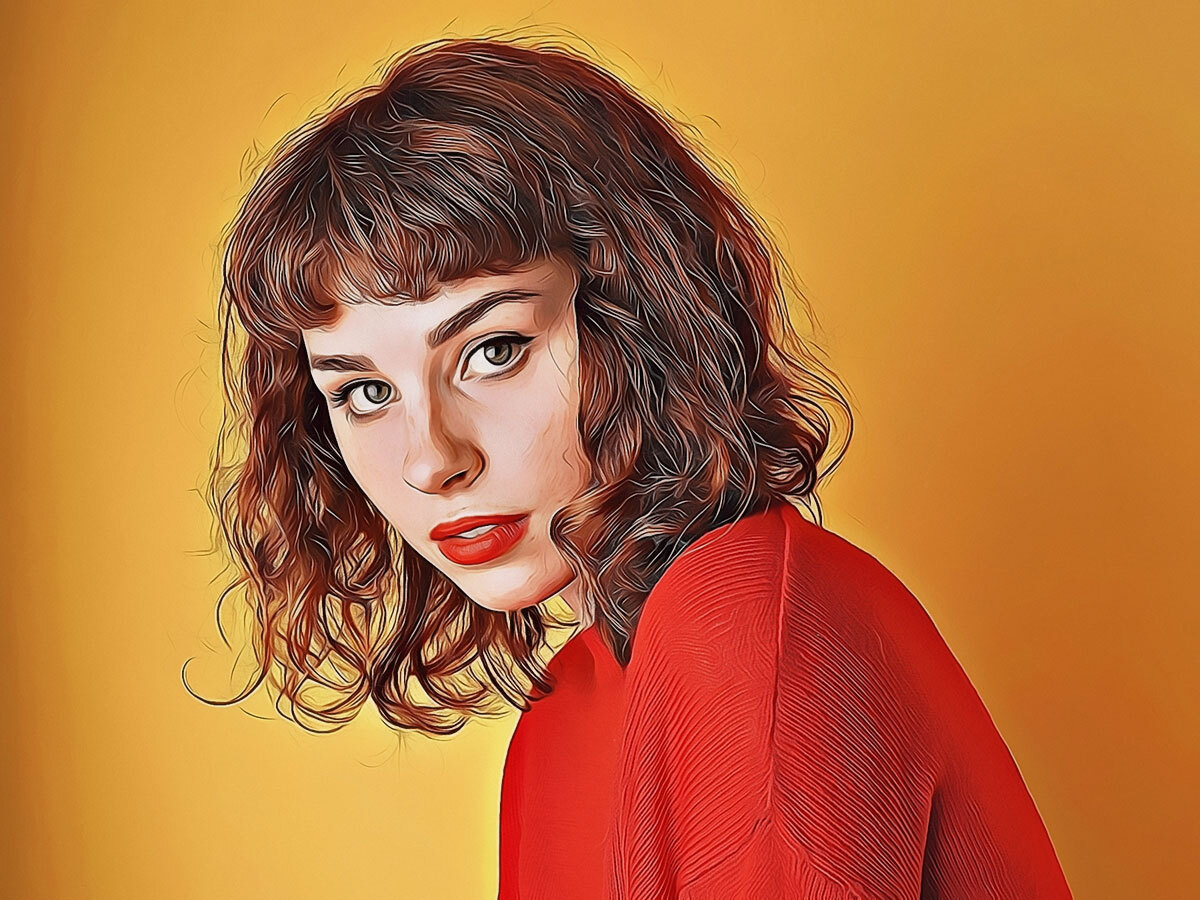
You can choose to adjust Opacity for a different look, and I dropped mine to 95%. Here’s a close-up look of the finished cartoon:
Drumroll please…
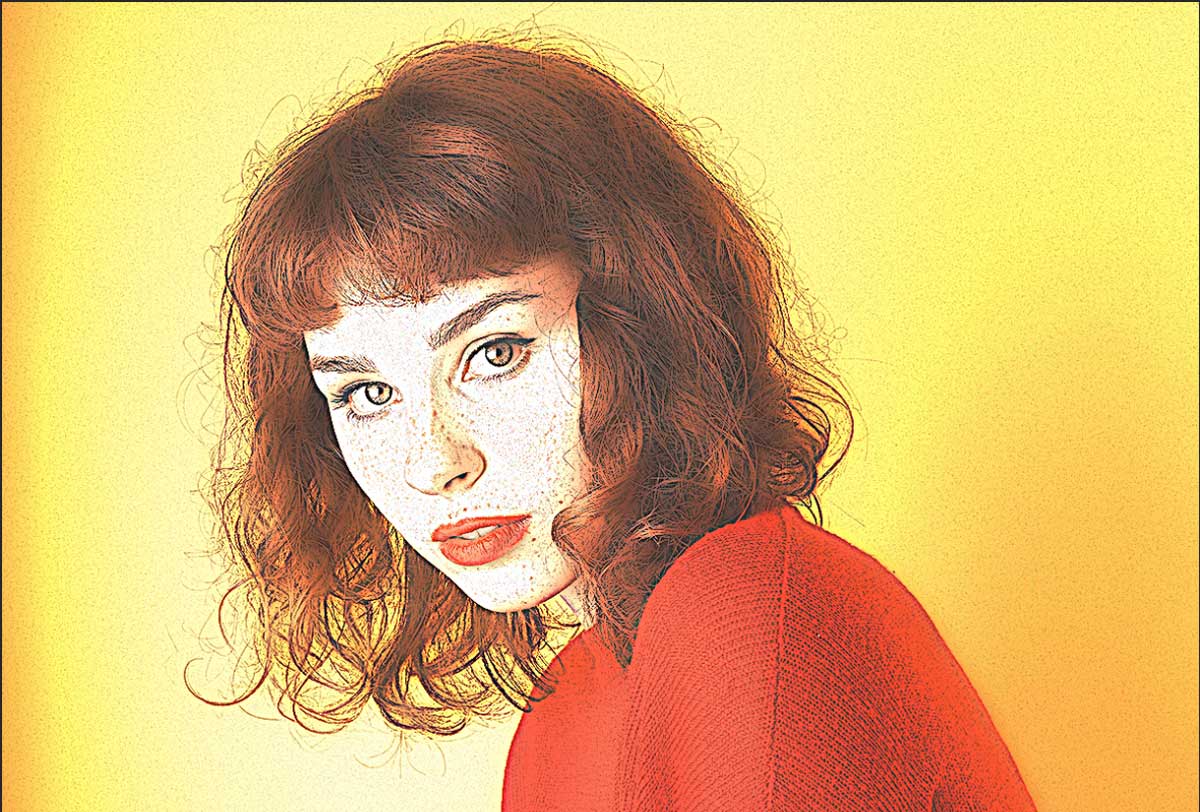
Don’t forget, if you mess up or get stuck then go back in the History Panel to a point where you were happy with the image. Find the History Panel by going to Window – History, and a panel will open up.
This panel shows every adjustment you made to the image, and you can go back to a specific one just by clicking on it, all the way back to when you first opened the image.
It’s like a time machine for Photoshop, and has often saved me from having to start over again from scratch when editing just by going back a few steps.
I hope you’re happy with the result, and now you know how to create a cartoon in Photoshop.
It was a lot of work though, wasn’t it? A lot of steps to follow and adjustments to make.
I know what you’re thinking:
“There must be an easier way!”
Luckily, there is!
Next, I’m going to show you how to use a free cartoon maker to get similar results but in much less time and with a lot less effort.
2. Using Colorcinch to Cartoonize Yourself
While image editing programs like Photoshop are great, they have a steep learning curve.
They also cost a lot – you can only get Photoshop and Lightroom on subscription now, and if you aren’t a power user then you’ll find it hard to get your money’s worth.
A handy alternative for turning photos into cartoons is an online cartoon maker like Colorcinch. It’s also free unless you decide to upgrade to a Plus platform, which unlocks a lot of extra features.
Here’s how we’re going to turn the same image into a cartoon using Colorcinch as a faster and easier alternative to Photoshop.
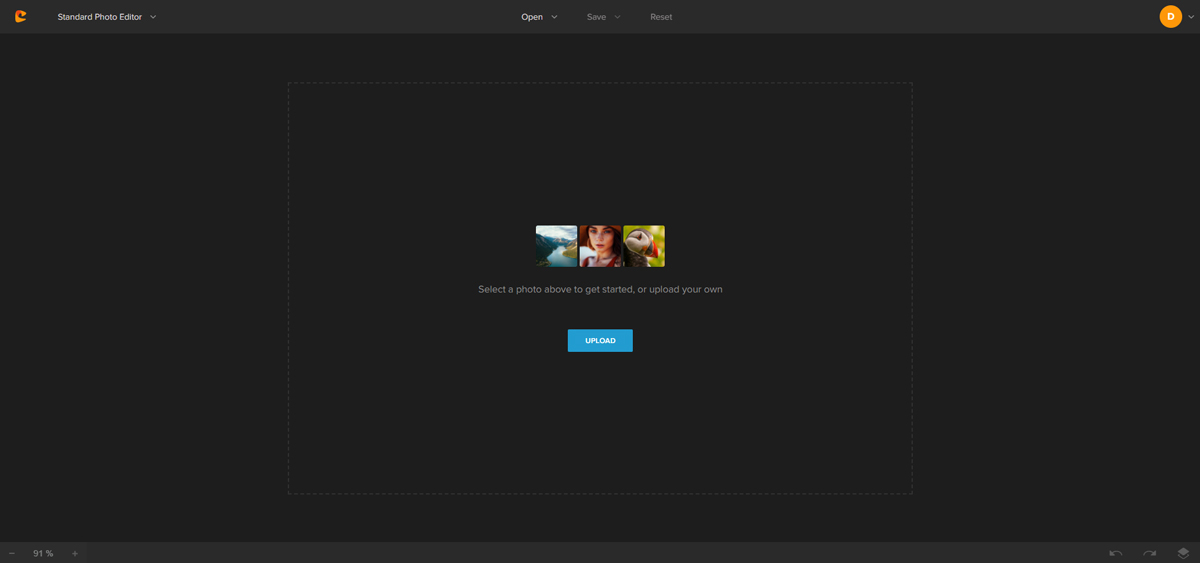
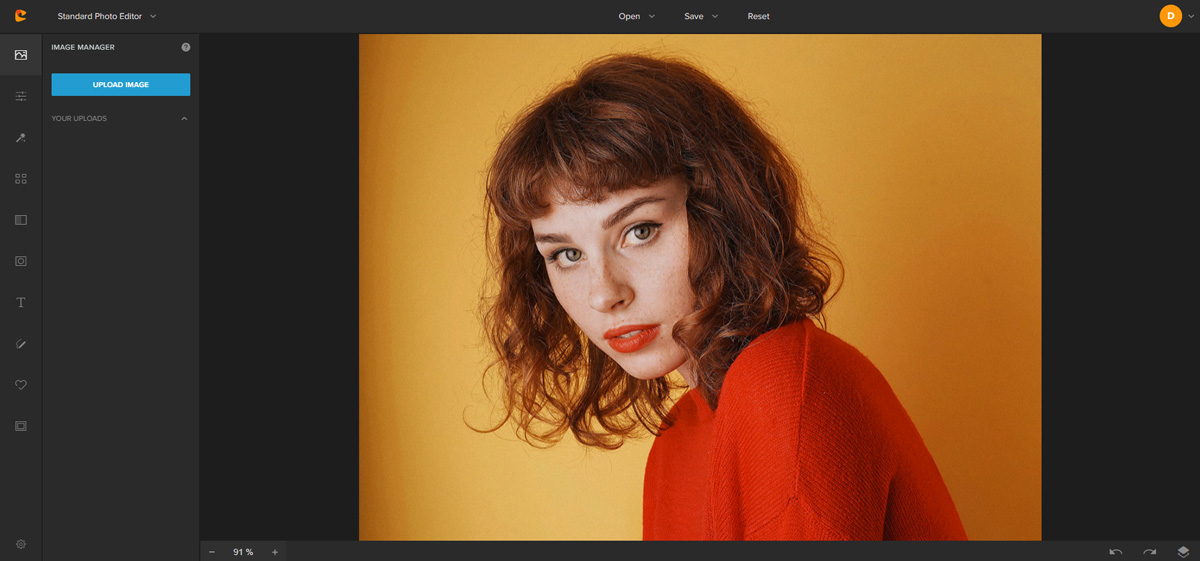
Step 1: Open Colorcinch
Open Colorcinch.
Step 2: Upload Your Image
Upload your chosen image, or use one of the sample photos.
For the sake of comparison between the two image-editing programs, I’m using exactly the same image as I did for Photoshop CC:
Step 3: The Control Panel
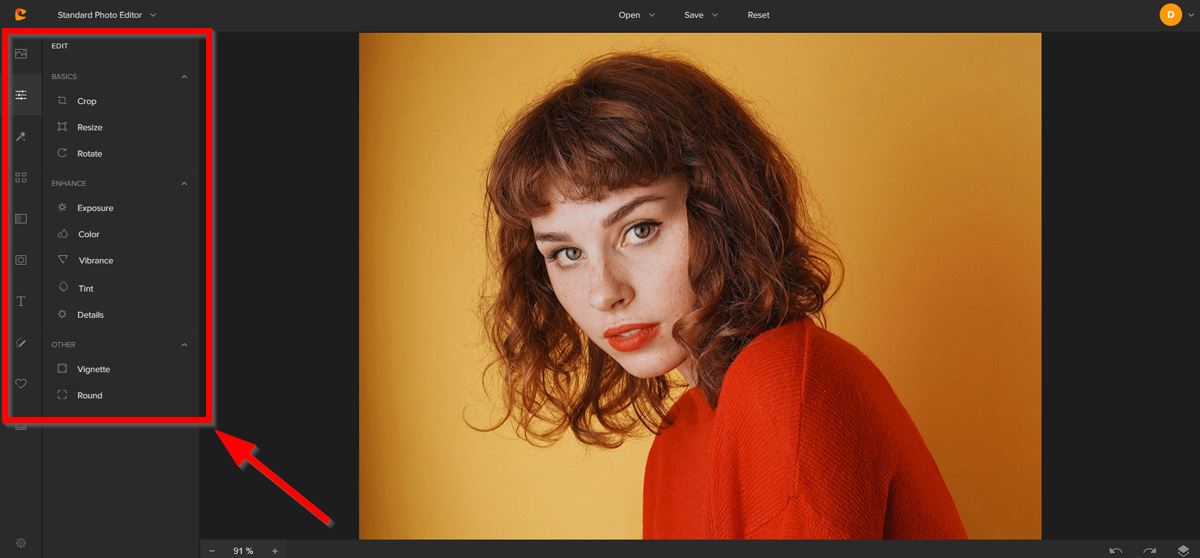
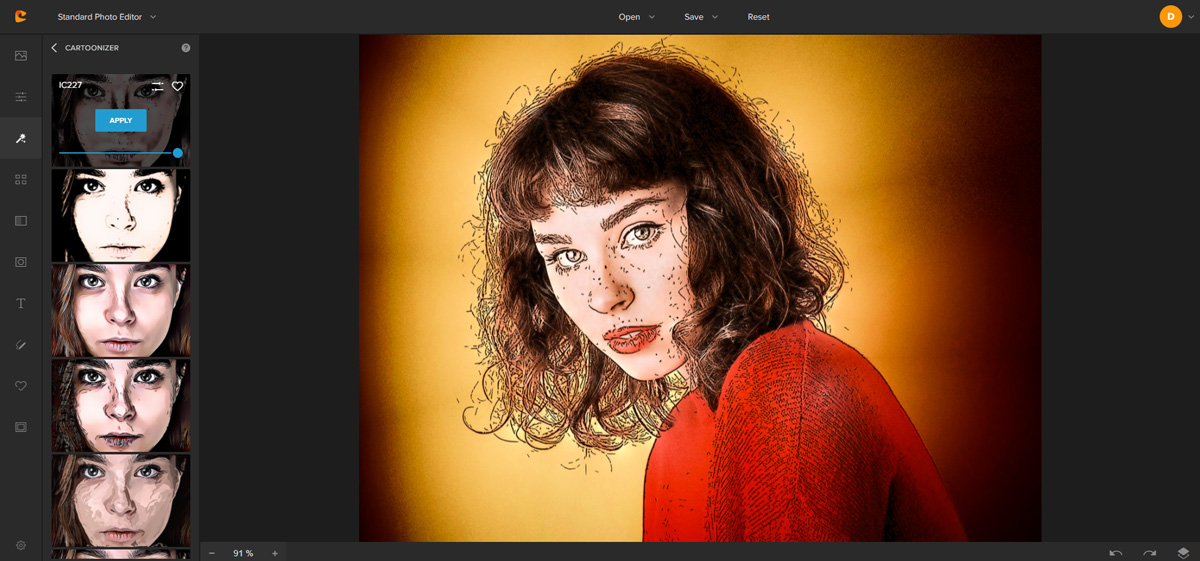
Down the left-hand side of the screen are all your essential editing controls:
- Image manager
- Edits
- Effects
- Filters
- Overlays
- Masks
- Text
- Draw
- Graphics
- Frames
Step 4: Find the Effects Menu
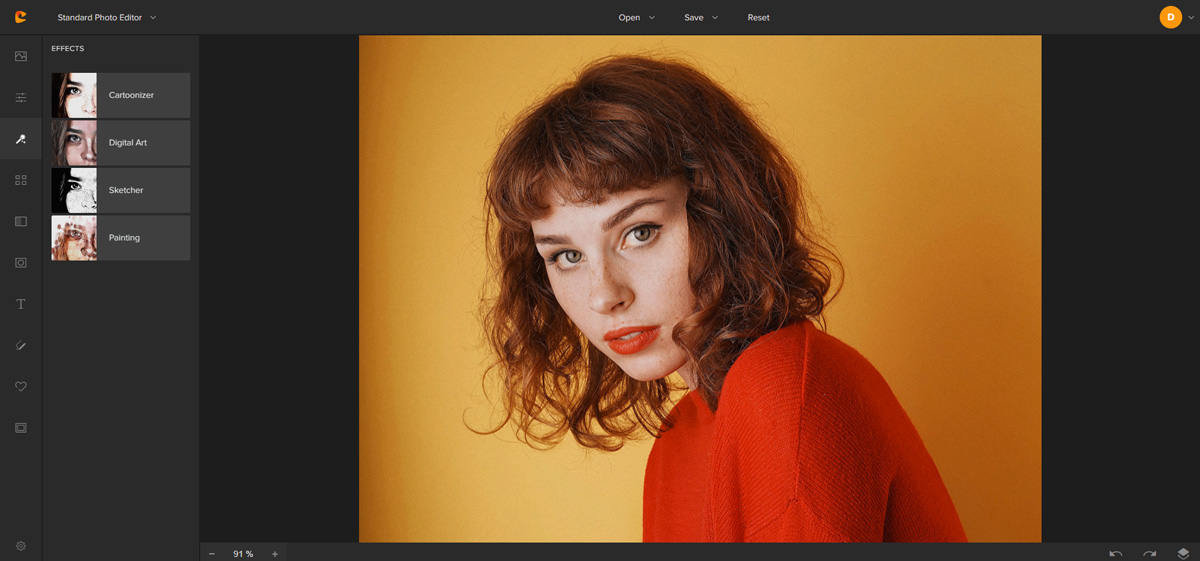
While we could get sidetracked by all the other cool effects and features, we’re here to make a cartoon out of a photo, so go to Effects.
You’ll see a list of categories in this module – Cartoonizer, Digital Art, Sketch, and Painting.
You know the one we want today, so go ahead and click on Cartoonizer.
Step 5: Choose Your Cartoon Style
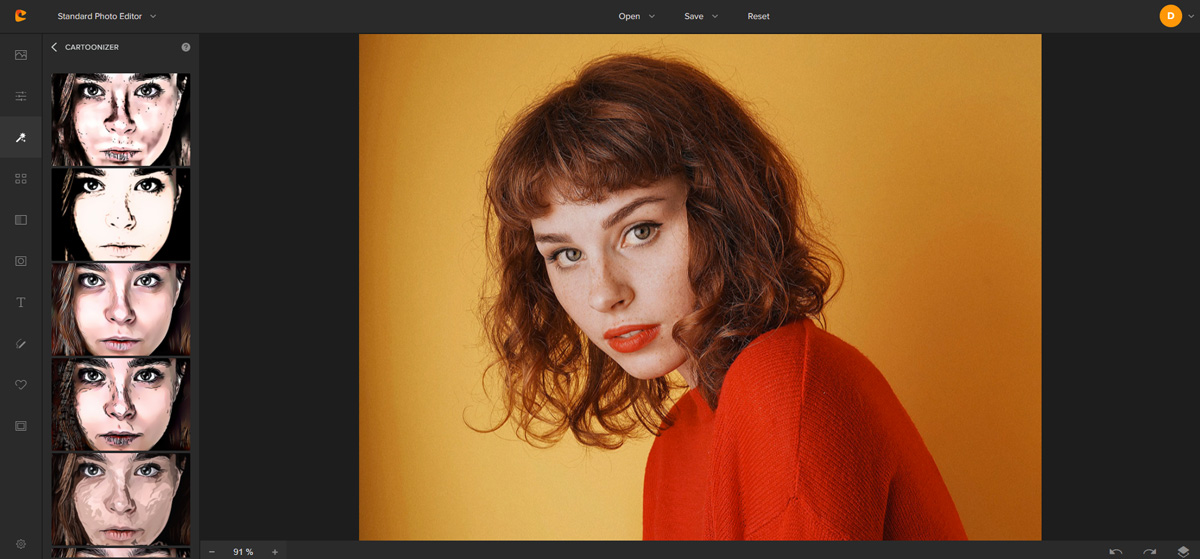
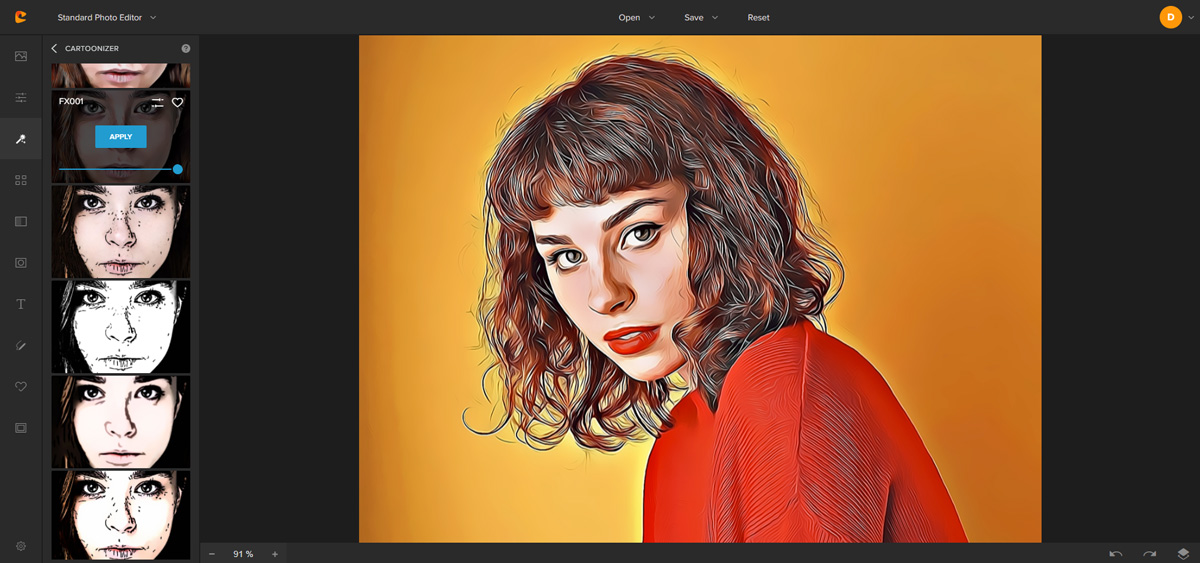
All your cartoonizing choices are displayed down the left-hand side, and you get to see the effects of each one before you apply them.
Scroll down the list to find an effect you like.
Let’s have some fun with it!
Step 6: Apply the Cartoon Effect
I chose the first cartoon effect at the top of the list, and I have to admit it does look pretty darn good:
Step 7: Make Adjustments
If you just want a very quick cartoonized photo, then you can save and enjoy your new creation – and it only took a minute or two, if that!
Before you can save your creation, you MUST click on Apply to permanently apply the effect onto your image.
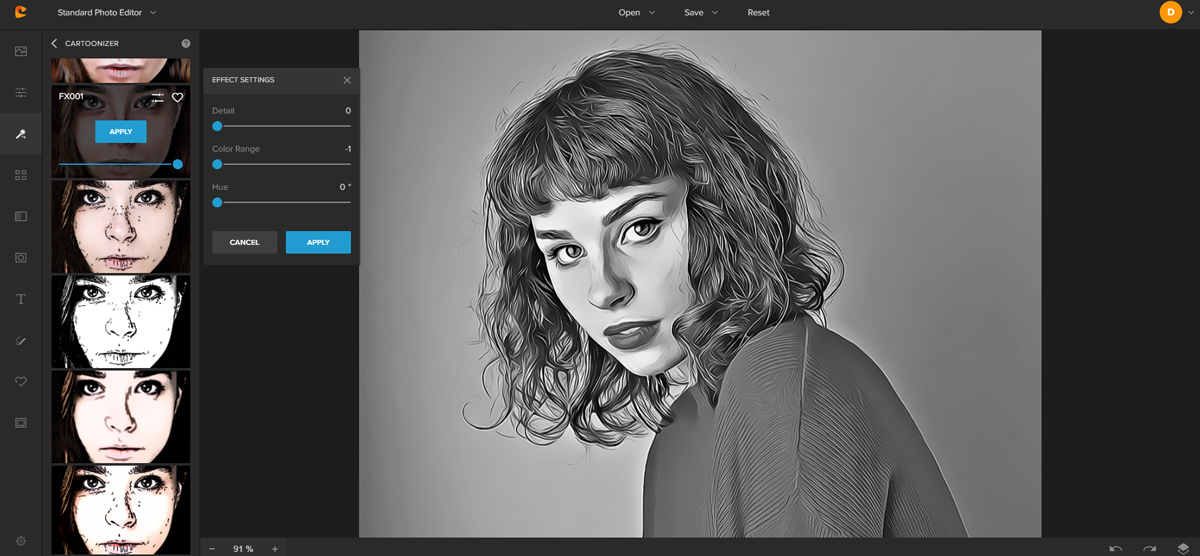
However, if you want to further tweak your cartoonified image, then you can adjust the sliders in the effect’s Advanced Settings:
Click on the slider icon in the top-right corner of the effect thumbnail (next to the heart icon), and unleash your creativity here:
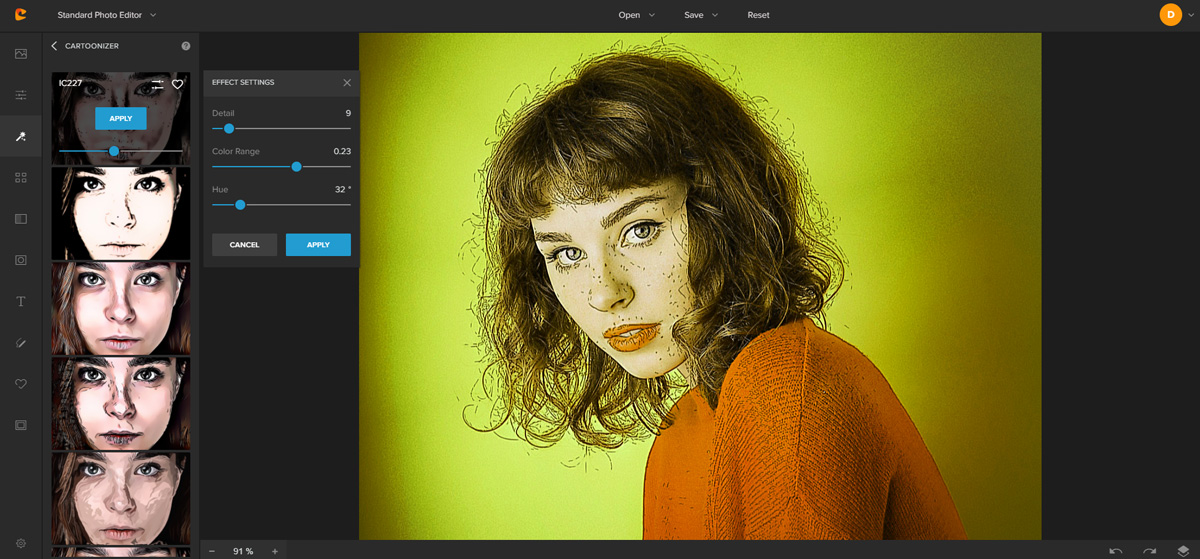
As you can see, I changed the Hue, Color Range, and Detail to achieve a totally different cartoon effect.
Step 8: Experiment and Enjoy!
That’s it – you’ve basically created a cartoon from a photo in a few simple steps, and without messing around with layers or blending modes like you did in Photoshop.
Here’s another cartoon variation or two created with Colorcinch for free:
(Warning – creating cool cartoons on here is addictive! I have just spent ages cartoonifying different images and tweaking them, and I’m supposed to be getting on and writing this article!):
Once you’ve finished cartoonizing your photos, save your work by clicking Apply.
Go to the top of the screen, and click Save. Choose to Save as Project (if you’re a Plus user) or to My Computer.
Upgrading to the Plus version of Colorcinch will give you access to many more professional image editing tools, effects and graphics, as well as more control over exporting and file size options.
This opens up a whole new world of image editing for you. Colorcinch is not just a clever way to create cartoons from photos – it’s a proper image editor. Like Photoshop, but simpler!
Conclusion
I hope you’ve enjoyed this tutorial on how to cartoonize yourself as much as I have!
If you followed along with both tutorials, which way of cartoonizing a photo did you prefer?
We’d love to know!


